2008년 4월 신작 자막 제작자 정리표


제작 : 디미네이트 (http://diminate.egloos.com)

초판 : 2008년 4월 3일

최종 수정일 : 2008년 4월 24일


※2008년 3월 혹은 4월부터 방영하는 작품의 자막 제작자 리스트입니다.

※방영 요일 및 시간은 다소 차이가 있을 수 있습니다.

※작품 제목의 해석은 제작자마다 차이가 있을 수 있습니다.

※오류 및 추가 정보 제보는 언제나 환영합니다.

※(미정)은 제작자 분께서 아직 확정 짓지 않으셨거나, 언급만 하신 경우입니다.

※(애사)는 블로그 업로드 여부가 확인되지 않고, ‘신비로 애니사랑 클럽’에 업로드 되고 있는 경우입니다.


요일

제목

방영시각

제작자

D.C.II.S.S. ~다카포II 세컨드 시즌~

(ダ・カーポいII セカンドシーズン)

00:30

디미네이트 Xian

㉲㉮제렌트

せいつる

ヒカリへ

가면의 메이드 가이

(仮面のメイドガイ)

01:35

을뀨

BLASSREITER

(ブラスレイタ)

02:00

페이티

stankovic

tanato

넷 고스트 PIPOPA

(ネットゴーストPIPOPA)

8:30

리안

절대가련 칠드런

(絶対可憐チルドレン)

10:00

디미네이트

을뀨

코드 기어스 ~반역의 루루슈~ R2

(コードギアス  反逆のルルーシュ R2)

17:00

디텍티브

프리스트

Len

Prisis

stankovic

광란 가족 일기

(狂乱家族日記)

01:00

늑대향

크로미트

프리스트

20면상의 딸

(二十面相の娘)

02:05

디미네이트

부탁해요 마이멜로디 키라랏

(おねがい♪マイメロディ きららっ★)

09:30

세이지준

개그만화 보기 좋은 날 3기

(増田こうすけ劇場ギャグマンガ日和)

23:00

을뀨

우리 집의 여우 신령님

(我が家のお稲荷さま)

00:00

프리스트

히라

은의 왕(닌자의 왕)

(隠の王)

01:30

라쉬

라윤

리안

여니

페어라인 자막팀

네오 안젤리크 Abyss

(ネオアンジェリーク Abyss)

02:00

디미네이트

aosora

소울 이터

(Soul Eater -ソウルイーター-)

18:00

늑대향

크로미트

Prisis

우리 집 세 자매

(うちの3姉妹)

17:30

을뀨

S.A ~스페셜 에이~

(S・A ~スペシャル・エー~)

월23:00

리안

을뀨

페어라인 자막팀

뱀파이어 기사

(ヴァンパイア騎士)

01:00

굄탕

미즈

여니

으니짱

쿠레나이

모노크롬 팩터

(モノクローム・ファクター)

02:00

디미네이트

유희왕 5D's

18:00

런닝투혼

미스X

RD 잠뇌조사실

(RD 潜脳調査室)

00:59

디미네이트

tanato

크리스탈 블레이즈

(Crystal Blaze -クリスタルブレイズ-)

01:15

디미네이트

비밀 ~탑 시크릿~

(秘密 ~トップシークレット~)

01:29

미사키

히라

장난스런 키스

(イタズラなKiss)

1:50

굄탕

미사키

미즈

오늘부터 마왕 3기

(今日からマ王! 第3シリーズ)

목 23:00

고냥마마

Len

stankovic

守辰사랑

앨리슨과 리리아

(アリソンとリリア)

목 23:30

미즈

여니

천일량

히라

페스키

마크로스 프론티어

(マクロス Frontier)

01:25

Prisis

아쓰맨

xxxHOLiC◆계

(xxxHOLiC◆継)

01:25

디미네이트

늑대향

라윤

진다

페이티

To LOVEる

(To LOVEる)

01:55

모토

뮤레

천상

쿠레나이

(紅 Kurenai)

02:00

을뀨

쿠레나이

용고기님(애사)

카이바

(カイバ)

00:00

tanato

도서관 전쟁

(図書館戦争)

00:45

디미네이트 페이티

프리스트

tanato

㉲㉮제렌트

순정 로맨티카

(純情ロマンチカ)

01:20

리안

미사키

히라

소울 이터 레이트쇼

(Soul Eater -ソウルイーター-)

02:15

늑대향

크로미트

Prisis

드루아가의 탑 ~the Aegis of URUK~

(ドルアーガの塔 ~the Aegis of URUK~)

01:15

젭흘이

Len

아마츠키

(あまつき)

02:30

디미네이트

고냥마마

라쉬

쿠레나이

せいつる

카노콘

(かのこん)

10:30

늑대향

모토

삼성중공업

일등급

크로미트

Xian

고르고 13

(ゴルゴ13)

01:23

디미네이트

펭귄 아가씨♥하트

(ペンギン娘♥はぁと)

12:00

아인

블루 드래곤 -천계의 칠룡-

(ブルードラゴン -天界の七竜-)

9:00

포우

월~금

Chi's Sweet Home

(チーズ スイートホーム)

06:40

컨츄리_Boy님(애사)


'etc > old' 카테고리의 다른 글

Java performance tips  (0) 2008.06.03
東京 狐の嫁入  (0) 2008.06.03
InputStream, OutputStream 쓰자.. (파일 읽고 쓰기)  (0) 2008.06.02
JDom을 이용하여 XML생성하기  (0) 2008.06.02
JDom 관련 문서  (0) 2008.06.02

자바에서 파일 읽고 쓰기..

    InputStream 과 OutputStream 사용


input ≒ read

output ≒ write


byte 단위

char 단위 (2byte)

읽기

InputStream

Reader

쓰기

OutputStream

Writer


ㅁ InputStream 의 메소드 두개만 알자

  int read() : 한 바이트씩 읽는다 (리턴형 int 는 데이터다..).. 느리지.. 느려..

  int read(byte[] b) : 한번에 왕창 읽는다 (데이터가 byte[] 배열에 저장. 리턴형 int 는 카운터다..)


ㅁ OutputStream 의 메소드

  void write(byte[] b) : b 바가지로 퍼다가 한번에 처리한다

  void write(byte[] b, int off, int len) : byte[] 배열에 저장, off 는 시작위치 어디부터, len 은 몇개

  void write(int b)


************************************************************************************


코드 예) 웹에서 파일 읽어서 복사

import java.io.*;
import java.net.*;

public class FileCopy1 {

 public static void main(String[] args) throws Exception{
 
  String path = "http://www.penfo.co.kr/bbs/data/free/emma201thumb.jpg";

  URL url = new URL(path);
  InputStream fin = url.openStream();
  System.out.println(fin.getClass().getName());
 
  OutputStream fos = new FileOutputStream("copy.jpg");
 
  while(true){
   int data = fin.read();
   if(data == -1){
    System.out.println("파일 끝났음");
    break;
   }
   fos.write(data);  
  }
  fin.close();
  fos.close();
 }

}

************************************************************************************


코드 예) 그냥 파일 읽고 복사하기

import java.io.*;

public class FileCopy2 {

 public static void main(String[] args) throws Exception{

  InputStream fin = new FileInputStream("aaa.txt");
  OutputStream fos = new FileOutputStream("ccc.txt");
 
  byte[] buffer = new byte[1024];
 
  while(true){
   int count = fin.read(buffer);
   System.out.println("COUNT : " + count);
   if(count == -1){
    System.out.println("더이상 읽은 데이터가 없다.");
    break;
   }
   fos.write(buffer, 0, count);
  }
  fin.close();
  fos.close();
 }

}


*************************************************************************************


파일 경로나 파일 검색 프로그램 기초 코딩 예)


import java.io.*;

public class FileSearcher {

 public void findAll(String folderName){
  File file = new File(folderName);
 
  File[] files = file.listFiles();
 
  for(int i=0; i<files.length; i++){
   if(files[i].isDirectory() == true){
    System.out.println("FOLDER : " + files[i].getAbsolutePath());
   }
   else{
    System.out.println("FILE : " + files[i].getName());
   }
  }
 }
 public static void main(String[] args) {

  FileSearcher searcher = new FileSearcher();
  searcher.findAll("C:\\Documents and Settings\\Axl\\My Documents\\Study\\JavaStudy");
 
 }

}

이걸 바탕으로 조금 수정해보자.....


'etc > old' 카테고리의 다른 글

東京 狐の嫁入  (0) 2008.06.03
2008년 4월 신작 자막 제작자 정리표  (0) 2008.06.03
JDom을 이용하여 XML생성하기  (0) 2008.06.02
JDom 관련 문서  (0) 2008.06.02
JDOM으로 XML 프로그래밍 단순화 하기 (한글)  (0) 2008.06.02
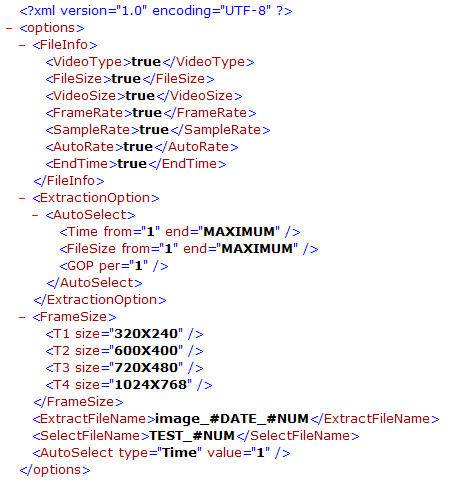
사용자 삽입 이미지

import java.io.*;

import org.jdom.*;
import org.jdom.output.*;

/**
 * JDom을 이용한  파서 예제
 * @author won
 *
 */
public class MakeXmlWithJDom {
    public static void main(String [] args) {
        new MakeXmlWithJDom();
    }
    public MakeXmlWithJDom(){
       
        /*
         * Create Root Element
         */
        Document doc = new Document();       
        Element rootElement = new Element("options");
        doc.addContent(rootElement);
       
        /*
         * Add FileInfo Element
         */       
        String[] inpFileElements = {"VideoType","FileSize","VideoSize","FrameRate","SampleRate","AutoRate","EndTime"};
        String[] inpFileValue = {"true","true","true","true","true","true","true"};
       
        Element fileInfoElement = new Element("FileInfo");       
        for(int i=0;i<inpFileElements.length;i++){
            addInnerElement(fileInfoElement, inpFileElements[i],inpFileValue[i]);   
        }
        rootElement.addContent(fileInfoElement);
                   
        /*
         * Add ExtractionOption Element
         */
        String inpAutoExtracValue = "true";
        String[] inpAutoElement = {"Time","FileSize","GOP"};
        String[][] inpAutoAttName = {{"from","end"},{"from","end"},{"per"}};
        String[][] inpAutoAttValue = {{"1","MAXIMUM"},{"1","MAXIMUM"},{"1"}};
               
        Element extractionOption = new Element("ExtractionOption");
        Element elAutoSelect = addInnerElement(extractionOption, "AutoSelect", "");
       
        for(int i=0;i<inpAutoElement.length;i++){
            Element tmpElement = addInnerElement(elAutoSelect, inpAutoElement[i],"");
            for(int j=0;j<inpAutoAttName[i].length;j++){
                addInnerAttribute(tmpElement, inpAutoAttName[i][j], inpAutoAttValue[i][j]);
            }
        }              
        rootElement.addContent(extractionOption);
       
        /*
         * Add FrameSize Element
         */
               
        String[] inpFrameSize = {"320X240","600X400","720X480","1024X768"};       
       
        Element frameSize = new Element("FrameSize");
        for(int i=0;i<inpFrameSize.length;i++){
            Element tmpElement = addInnerElement(frameSize, "T"+(i+1),"");
            addInnerAttribute(tmpElement, "size", inpFrameSize[i]);
        }       
        rootElement.addContent(frameSize);
       
        /*
         * Add ExtractFileName Element
         */
        String inpExtractFileName="image_#DATE_#NUM";
        Element extractFileName = new Element("ExtractFileName");
        extractFileName.setText(inpExtractFileName);
        rootElement.addContent(extractFileName);
       
        /*
         * Add SelectFileName Element
         */
       
        String inpSelectFileName="TEST_#NUM";
        Element selectFileName = new Element("SelectFileName");
        selectFileName.setText(inpSelectFileName);
        rootElement.addContent(selectFileName);
       
        /*
         * Add AutoSelect Element
         */
        String inpAutoType="Time";
        String inpAutoValue="1";
       
        Element autoSelect = new Element("AutoSelect");
        addInnerAttribute(autoSelect,"type",inpAutoType);
        addInnerAttribute(autoSelect,"value",inpAutoValue);       
        rootElement.addContent(autoSelect);
       
        /*
         * Preparing for printout
         */       
                       
        XMLOutputter outp = new XMLOutputter();       
       
        /*
         * file output
         */
         try {
            OutputStream fos = new FileOutputStream("C:\\mmm.xml");
            outp.output(doc, fos);
        } catch (Exception e) {
            e.printStackTrace();
        }
       
        /*
         * screen output
         */
        /*
        try{           
            outp.output(doc, System.out);
           
        }
        catch (IOException e) {
            System.out.println(e);
        }
        */   
    }
   
    /**
     * 엘레멘트 하위 요소를 추가하여 준다.
     * @param target 추가하려는 엘레멘트
     * @param eElement 신규 엘레멘트 이름
     * @param eValue 신규 엘레멘트 값
     * @return 신규 엘레멘트
     */
    public Element addInnerElement(Element target, String eElement, String eValue){
        Element newElement = new Element(eElement);
        newElement.setText(eValue);
        target.addContent(newElement);
        return newElement;
    }
   
    /**
     * <pre>
     * 엘레먼트 내부에 어트리뷰트를 추가하여 준다.
     * 추가시 입력된 순서대로 추가된다.
     * </pre>
     * @param target 추가하려는 엘레먼트
     * @param attName 어트리뷰트 이름
     * @param attValue 어트리뷰트 값
     */
    public void addInnerAttribute(Element target, String attName, String attValue){
        Attribute newElement = new Attribute(attName,attValue);
        target.setAttribute(newElement);       
    }
};

사람 눈에 맞춰 문서의 인쇄 상태를 보기 좋게 만들려면 포멧을 변경하면 된다.

Format fm = Format.getPrettyFormat();

XMLOutputter outp = new XMLOutputter(fm);

자세한 내용은 org.jdom.output.Format 를 참조하여 변경하면 된다.


참조 사이트 : http://www.javaworld.com/javaworld/jw-05-2000/jw-0518-jdom.html
XML 파싱관련


JDOM 1.1

JDOM 1.1 Java-Doc

JDOM Makes XML Easy (PDF)

출처 : http://www.jdom.org/

더 좋은 파서가 있다면 리플부탁 드리겠습니다. ㅋㅋ

오픈 소스 API로 XML 문서 조작을 단순하게


난이도 : 중급

Wes Biggs, Senior Developer, T.H.I.
Harry Evans, Senior Developer, T.H.I.

2007 년 8 월 28 일


JDOM은 XML과 함께 작동하는 고유한 자바 툴킷으로서, XML 애플리케이션의 신속한 개발을 목적으로 설계되었습니다. JDOM의 디자인에는 자바 언어의 신택스부터 의미까지 포괄되어 있습니다. 하지만, 기존의 XML API보다 과연 얼마나 나을까요? 여러분이 직접 예제를 실행해 보고, 오픈 소스 프로젝트의 디자인 목표와 비교하면서 판단해 봅시다.


개발자인 여러분들도 80-20 규칙에 대해 들어봤을 것이다. 프로세스나 방법론이 모든 상황의 80 퍼센트를 차지하고, 나머지 20 퍼센트는 상황 별로(case-by-case) 다루어져야 한다. 소프트웨어 개발 세계에서 개발자가 주어진 기술을 사용하여 수행할 수 있는 일들의 80 퍼센트를 이룩하기는 매우 쉽다.

물론, 소프트웨어 제품과 표준이 80-20 규칙을 늘 따르는 것은 아니다. 특히 자바 XML 툴의 어긋난 부분은 이 규칙의 예외를 증명하고 있다. 자바 프로그래밍 세계는 수 많은 API들로 가득 차있다. 어떤 것은 자생한 것이고, 어떤 것은 대기업의 마케팅의 지원을 받기도 한다. XML의 보편성에 대한 약속으로서, 모든 새로운 태스크에는 새로운 기술이 있다. 하지만, 무엇이 접착제 역할을 하고, 여러분은 80 퍼센트의 작업을 수행하는데 적합한 툴을 어떻게 찾겠는가? JDOM은 이러한 질문을 염두 해 두고 구현된 XML API이다.

자바와 XML

소셜 북마크

mar.gar.in
Digg
del.icio.us
Slashdot

여러 가지 면에서, 자바 언어는 XML을 위한 프로그래밍 언어가 되었다. Apache Software Foundation과 IBM alphaWorks의 노력으로 XML 문서의 생성, 조작, 변형, 파싱을 위한 완전한 툴 체인이 생겼다.

많은 자바 개발자들은 XML을 매일 사용하지만, Sun은 XML을 자바 플랫폼에 적용하는데 뒤쳐졌다. Java 2 플랫폼은 XML이 비즈니스 대 비즈니스 통합부터 웹 사이트 콘텐트 스트리밍에 이르기까지 모든 것에 대한 핵심 기술이 되기 전에 가치 있는 것이 되었기 때문에 Sun은 폭넓은 채택성을 획득했던 기존 XML API의 창시자가 되는 JSR 프로세스를 사용해왔다. 가장 중요한 것은 JAXP(Java API for XML Parsing)의 추가이다. 여기에는 세 개의 패키지들이 포함된다.

  • org.w3c.dom: XML을 위한 표준 프로그래밍 방식의 Document Object Model의 W3C recommendation의 자바 구현.
  • org.xml.sax: XML 파싱을 위한 이벤트 중심의 API.
  • javax.xml.parsers: 애플리케이션 개발자들이 특정 파서 구현을 설정하고 획득할 수 있도록 해주는 팩토리 구현.

이러한 패키지들의 추가가 자바 개발자들에게는 좋은 일이지만, 고급의 자바-XML 상호 운용성으로 큰 도약을 이룬 것이 아닌 기존 API 표준에 대한 일반적인 순응을 나타낸다. 핵심 자바 플랫폼에서 부족한 것은 XML 문서를 자바 객체로서 조작할 수 있는 매력적인 인터페이스이다.

JDOM을 생각해 보자. 유명한 자바 개발자이자 작가인 Brett McLaughlin과 Jason Hunter의 생각의 산물인 JDOM은 2000년 초반에 Apache 계열의 라이센스 하에서 오픈 소스 프로젝트로서 시작되었다. 폭넓은 자바 개발자 베이스로부터 기여와 피드백, 버그 픽스를 받아들였고, 자바 코드에서 XML 데이터에 액세스 하여, 조작 및 결과를 만들어 내는 완벽한 자바 플랫폼 기반의 솔루션 구현을 목표로 설정했다.


위로


API로서의 JDOM

JDOM은 XML 문서들을 프로그래밍 방식으로 조작하는 org.w3c.dom 패키지에 대한 대안으로서 사용될 수 있다. 완벽한 대체는 아니고, 사실, JDOM과 DOM은 공존할 수 있다. 게다가, JDOM은 텍스트 인풋에서 XML을 파싱하는 것을 신경 쓰지 않는다. 파서 구현을 설정 및 실행하는데 도움이 되는 래퍼 클래스를 제공하기도 한다. JDOM은 기존 API를 기반으로 구현되었다.

대안 API의 필요성을 이해하려면, W3C DOM의 디자인 제약 조건에 대해 살펴보자.

  • 언어 독립성. DOM은 자바 언어를 염두 해 두고 설계되지 않았다. 이것의 접근 방식은 다양한 언어들 사이에서 매우 비슷한 API를 유지하지만, 자바의 이디엄에 익숙한 프로그래머에게는 성가신 API이다. 예를 들어, 자바 언어는 String 클래스가 언어에 구현되어 있지만, DOM 스팩은 고유의 Text 클래스를 정의한다.

  • 엄격한 계층. DOM의 API는 XML 스팩을 따른다. 따라서, 모든 것의 노드가 되는 XML에서, 모든 것이 확장하는 DOM에서 Node 기반 인터페이스와 Node를 리턴하는 메소드의 호스트를 찾는다. 이는 다형성의 관점에서 볼 때는 뛰어나지만, 자바 언어로 작업하기에는 불편하다. Node에서 리프(leaf) 유형으로의 변화는 장황하고 이해하기 어려운 코드를 만든다.

  • 인터페이스 중심. 퍼블릭 DOM API는 인터페이스들로만 구성된다. (한 가지 예외는 Exception 클래스이다.) W3C는 인터페이스를 정의할 때 구현을 제공하는 것에는 관심이 없다. 자바 프로그래머로서 API를 사용한다는 것은 XML 객체들을 생성할 때 어느 정도의 분리가 된다. W3C 표준은 일반적인 팩토리 클래스와 유연하지만 덜 직접적인 패턴들을 사용하기 때문이다. XML 문서들이 애플리케이션 레벨 코드가 아닌 파서에 의해서만 구현되는 특수한 경우, 이는 무관하다. 하지만, XML 사용이 널리 퍼지면서, 애플리케이션 개발자들은 XML 객체들을 프로그래밍 방식으로 구현하는 편리한 방법을 필요로 하게 되었다.

프로그래머에게, 이러한 제약 조건은 (메모리 사용과 인터페이스 규모 면에서) 무겁고 다루기 어렵다는 것을 의미한다. 반대로, JDOM은 자바 중심의, 경량의 API이다. DOM의 원리를 조정하여 위에 언급한 불편함을 해소시켰다.

  • JDOM은 자바 플랫폼 식이다. 이 API는 자바 언어의 빌트인 String 지원을 사용하기 때문에, 텍스트 값은 String으로서 언제나 사용할 수 있다. ListIterator 같은 Java 2 플랫폼 컬렉션 클래스도 활용하면서 자바 언어에 익숙한 프로그래머에게 풍부한 환경을 제공한다.

  • 계층이 없음. JDOM에서, XML 엘리먼트는 Element의 인스턴스이고, XML 애트리뷰트는 Attribute의 인스턴스이며, XML 문서는 Document의 인스턴스이다. 이 모든 것들이 XML에서 다른 개념들을 나타내기 때문에, 무정형의 "노드"로서가 아닌 고유의 유형으로서 참조된다.

  • 클래스 중심. JDOM 객체는 Document, Element, Attribute 같은 클래스들의 직접적인 인스턴스이므로, 이를 구현하는 것은 자바 언어에서 new 연산자를 사용하는 것만큼이나 쉽다. 또한 설정 할 팩토리 인터페이스가 없다. JDOM은 jar에서 직접 사용할 준비가 되어있다.


위로


JDOM 문서 구현 및 조작

JDOM은 표준 자바 코딩 패턴을 사용한다. 가능하다면, 복잡한 팩토리 패턴 대신에 자바 new 연산자를 사용하면서, 신참 사용자들도 객체를 쉽게 조작할 수 있게 해준다. JDOM을 사용하여 XML 문서를 구현하는 방법을 살펴보자. 우리가 구현할 구조는 Listing 1과 같다. (참고자료 섹션에서 전체 코드를 다운로드 할 수 있다.)


Listing 1. 구현할 XML 문서 샘플
                

<?xml version="1.0" encoding="UTF-8"?>
<car vin="123fhg5869705iop90">
<!--Description of a car-->
<make>Toyota</make>
<model>Celica</model>
<year>1997</year>
<color>green</color>
<license state="CA">1ABC234</license>
</car>

주: 아래 Listing 2부터 7까지 샘플 문서를 구현할 것이다.

먼저, 루트(root) 엘리먼트를 만들고 이를 문서에 추가한다.


Listing 2. Document 구현하기
                

Element carElement = new Element("car");
Document myDocument = new Document(carElement);

이 단계는 새로운 org.jdom.Element를 만들고, 이것을 org.jdom.Document myDocument의 루트 엘리먼트로 만든다. (참고자료 섹션에서 제공하는 샘플 코드를 사용하고 있다면 반드시 org.jdom.*을 반입하라.) XML 문서는 하나의 루트 엘리먼트를 가져야 하므로, Document는 생성자에 Element를 취한다.

다음에는, vin 애트리뷰트를 추가한다.


Listing 3. Attribute 추가하기
                

carElement.addAttribute(new Attribute("vin", "123fhg5869705iop90"));

엘리먼트를 추가하는 것도 매우 단순하다. make 엘리먼트를 추가한다.


Listing 4. 엘리먼트와 하위 엘리먼트
                

Element make = new Element("make");
make.addContent("Toyota");
carElement.addContent(make);

ElementaddContent 메소드가 Element를 리턴하므로, 이를 다음과 같이 작성할 수 있다.


Listing 5. 간결한 형식으로 엘리먼트 추가하기
                

carElement.addContent(new Element("make").addContent("Toyota"));

이 문장들 모두 같은 일을 수행한다. 첫 번째 예제는 보다 읽기 쉽지만, 두 번째는 많은 엘리먼트들을 한번에 구현한다면 더욱 읽기 쉬울 것이라고 말할 수도 있겠다. 문서 구현을 완료하려면 다음과 같이 한다.


Listing 6. 나머지 엘리먼트 추가하기
                

carElement.addContent(new Element("model").addContent("Celica"));
carElement.addContent(new Element("year").addContent("1997"));
carElement.addContent(new Element("color").addContent("green"));
carElement.addContent(new Element("license")
.addContent("1ABC234").addAttribute("state", "CA"));

license 엘리먼트의 경우, 엘리먼트의 콘텐트를 추가했을 뿐만 아니라, 여기에 애트리뷰트도 추가하면서, 라이센스가 발행되었던 상태를 지정하고 있다. Element에 대한 addContent 메소드는 Element만 리턴하기 때문에 이것이 가능하다.

주석 섹션이나 기타 표준 XML 유형을 추가하는 것도 같은 방식이다.


Listing 7. 주석 추가하기
                

carElement.addContent(new Comment("Description of a car"));

문서 조작은 비슷한 방식으로 발생한다. 예를 들어, year 엘리먼트에 대한 레퍼런스를 획득하려면, ElementgetChild 메소드를 사용한다.


Listing 8. 자식 엘리먼트에 액세스 하기
                

Element yearElement = carElement.getChild("year");

이 문은 실제로 엘리먼트 이름 year를 가진 자식 Element를 리턴한다. year 엘리먼트가 없다면, 호출은 어떤 것도 리턴하지 않는다. DOM Node Node 인터페이스 같은 것에서 리턴 값을 던질 필요가 없었다. Element의 자식 들은 단순히 Element이다. 비슷한 방식으로, 문서에서 year 엘리먼트를 제거할 수 있다.


Listing 9. 자식 엘리먼트 제거하기
                

boolean removed = carElement.removeChild("year");

이 호출은 year 엘리먼트만 제거한다. 나머지 문서는 바뀌지 않은 채로 남아있다.

엘리먼트만 제거한다. 나머지 문서는 바뀌지 않은 채로 남아있다. XMLOutputter 클래스를 사용한다.


Listing 10. JDOM을 XML 텍스트로 바꾸기
                

try {
XMLOutputter outputter = new XMLOutputter(" ", true);
outputter.output(myDocument, System.out);
} catch (java.io.IOException e) {
e.printStackTrace();
}

XMLOutputter는 포맷팅 옵션을 갖고 있다. 여기에서, 우리는 부모 엘리먼트에서 두 스페이스를 들여쓰기 한 자식 엘리먼트를 원한다고 지정했고, 엘리먼트들 사이에 새로운 라인을 원한다는 것을 지정했다. XMLOutputterWriter 또는 OutputStream을 출력한다. 파일로 출력하려면 아웃풋 라인을 다음과 같이 바꾼다.


Listing 11. FileWriter를 사용하여 XML 출력하기
                

FileWriter writer = new FileWriter("/some/directory/myFile.xml");
outputter.output(myDocument, writer);
writer.close();


위로


기존 XML 툴과 결합하기

JDOM의 재미있는 기능들 중 하나는 다른 API들과의 상호 운용성이다. JDOM을 사용하여, Stream 또는 Reader 뿐만 아니라, SAX Event Stream 또는 DOM Document로 서도 문서를 출력할 수 있다. 이러한 유연성 때문에 JDOM이 이종의 환경에서 사용될 수 있고, XML을 핸들링 하는 또 다른 메소드를 이미 사용하고 있는 시스템에 추가될 수 있다. 나중에 예제에서 보겠지만, JDOM은 JDOM 데이터 구조를 인식하지 못하는 다른 XML 툴을 사용할 수 있다.

JDOM의 또 다른 사용법은 이미 존재하는 XML 데이터를 읽고 조작하는 기능이다. 잘 구성된 XML 파일을 읽는 것은 org.jdom.input의 클래스들 중 하나를 사용함으로써 수행된다. 이 예제에서, 우리는 SAXBuilder를 사용할 것이다.


Listing 12. SAXBuilder를 사용하여 XML 파일 파싱하기
                

try {
SAXBuilder builder = new SAXBuilder();
Document anotherDocument =
builder.build(new File("/some/directory/sample.xml"));
} catch(JDOMException e) {
e.printStackTrace();
} catch(NullPointerException e) {
e.printStackTrace();
}

Listing 2부터 7까지의 방식과 똑같이 이 프로세스를 통해 구현된 문서를 조작할 수 있다.

JDOM의 또 다른 적용은 이를 Apache의 Xalan 제품과 결합하는 것이다. (참고자료) 위 자동차 예제를 사용하여, 특정 자동차에 대한 상세를 제공하는 온라인 자동차 딜러용 웹 페이지를 구현할 것이다. 우선, 이 문서는 우리가 사용자에게 제공하고자 하는 자동차에 대한 정보를 나타낸다. 그런 다음, 이 JDOM Document를 XSL 스타일 시트로 결합하고, HTML 포맷의 결과를 서블릿의 OutputStream으로 출력할 수 있다.

이 경우, 우리가 사용할 XSL 스타일시트는 car.xsl이다.


Listing 13. 자동차 기록을 HTML로 변형하는 XSL 문서
                

<?xml version="1.0" encoding="UTF-8"?>

<xsl:stylesheet version="1.0" xmlns:xsl="http://www.w3.org/1999/XSL/Transform">
<xsl:template match="/car">
<html>
<head>
<title><xsl:value-of select="make"/> <xsl:value-of select="model"/>
</head>
<body>
<h1><xsl:value-of select="make"/></h1><br />
<h2><xsl:value-of select="model"/></h2><br />
<table border="0">
<tr><td>VIN:</td><td><xsl:value-of select="@vin"/></td></tr>
<tr><td>Year:</td><td><xsl:value-of select="year"/></td></tr>
<tr><td>Color:</td><td><xsl:value-of select="color"/></td></tr>
</table>
</body>
</html>
</xsl:template>
</xsl:stylesheet>

이제, org.jdom.Document를 DOM Document로 바꾸고, 이것을 Xalan에 제공한다. XSL과 가상의 애플리케이션 서버에서 가져온 OutputStream을 나타내는 파일도 함께 제공한다. (Listing 14)


Listing 14. JDOM과 Xalan을 사용하여 HTML 문서 생성하기
                

TransformerFactory tFactory = TransformerFactory.newInstance();

// Make the input sources for the XML and XSLT documents
org.jdom.output.DOMOutputter outputter = new org.jdom.output.DOMOutputter();
org.w3c.dom.Document domDocument = outputter.output(myDocument);
javax.xml.transform.Source xmlSource =
new javax.xml.transform.dom.DOMSource(domDocument);
StreamSource xsltSource =
new StreamSource(new FileInputStream("/some/directory/car.xsl"));

// Make the output result for the finished document using
// the HTTPResponse OutputStream
StreamResult xmlResult = new StreamResult(response.getOutputStream());

// Get a XSLT transformer
Transformer transformer = tFactory.newTransformer(xsltSource);

// Do the transform
transformer.transform(xmlSource, xmlResult);

이 예제에서, 아웃풋은 자바 서블릿의 HTTPResponse OutputStream을 통해 체계화 된다. 하지만, 이 스트림은 XMLOutputter를 사용한 이전 예제처럼 쉽게 파일스트림이 될 수 있다. 우리는 DOMOutputter를 사용하여 Xalan용 XML 소스를 생성했다. 하지만, XMLOutputter를 사용하여 XML 문서를 String으로서 출력하고 이를 StreamSource로 만듦으로써 같은 인풋을 생성할 수 있었다. 유연성에 대해서 보자. JDOM은 그 구조를 String, SAX Event Stream, 또는 DOM Document로서 출력할 수 있다. 이는 JDOM이 인풋으로서 이러한 모델을 취할 수 있는 툴과 상호 작동할 수 있도록 해준다. (JDOM 웹 사이트에서 contrib 패키지를 참조하라. 여기에서 JDBC ResultSet-기반 빌더, XPATH 구현 같은 툴을 제공하는 JDOM 기반 유틸리티의 라이브러리를 찾을 수 있다.)

몇 줄의 코드로, JDOM은 다양한 기능을 실행한다. 우리는 XML에서 파싱하고 프로그래밍 방식으로 XML 문서를 생성하고, 그러한 문서들을 조작했고, XML 중심의 웹 페이지를 생성하는데 이를 사용했다.

Sun과 JDOM
JDOM 의 공식 1.0 릴리스는 Java Community Process의 진행 과정과 발을 맞춘다. JSR-102로서 제출된 JDOM은 핵심 자바 플랫폼에 들어가도록 승인을 얻었다. 다음은 Sun 측에서 말한 부분이다. "JDOM은 이전 API들보다 사용하기가 훨씬 더 쉽기 때문에, 이 플랫폼에 매우 유용할 것이라고 생각한다." JSR에 따르면, 1.0 릴리스는 JDOM의 패키징 변화를 "org.jdom"에서 "javax.xml.tree"로 간주하고 있다. 미래는 긍정적이지만, 개발자들은 새로운 버전에 발을 맞추려면 코드를 개선해야 한다.


위로


JDOM의 성장: 미래

이 글을 쓰고 있는 현재, JDOM 프로젝트는 Beta 6 버전을 릴리스 했다. 베타 상태임에도, JDOM은 안정적인 구현으로 입증되었다. API의 많은 부분이 안정적이고, 기존 인터페이스들에 잠재적으로 영향을 줄 많은 부분에서 작업이 진행 중이다. 따라서, 이 시점에서 진행되는 어떤 개발 프로젝트라도 JDOM을 무시해서는 안되겠다. 특정 메소드 시그너처와 특정 의미가 바뀔 것이고 핵심 자바 API에 채택될 것이기 때문이다. (Sun과 JDOM 참조)

JDOM을 위한 단기적인 TO-DO 리스트는 API를 안정화 하고 성능 부분을 평가하는 것에 초점이 맞춰졌다. 개발자들을 애먹이는 부분에는 DTD 엔터티 지원과 기타 구조들이다. XPATH 지원과 보다 직접적인 XML 데이터 소스와의 통합 등이 진행 중이다.

그래서, JDOM은 기존 XML API들보다 더 나은가? 여러분이 자바로 꿈을 꾼다면 대답은 '그렇다'이다. JDOM이 여러분이 선호하는 파서나 XML 인식 데이터베이스를 대체하는 것은 아니지만, 이것의 디자인 원리는 XML 세계에 적용될 수 있다.


참고자료


필자소개


Wes Biggs는 Los Angeles Times, USWeb, Elite Information Systems 등 여러 기업들에서 인터넷 애플리케이션을 개발했다. 오픈 소스 자바 프로젝트의 기여자이며, Free Software Foundation의 gnu.regexp 정규식 패키지를 관리하고 있다. (wes@tralfamadore.com)


Harry Evans는 소프트웨어 디자인과 애플리케이션 엔지니어링 분야에서 경력을 쌓았다. 여러 웹 기반 및 인터넷 인식 제품들의 디자인 분야에서 일했다. Rapid Application Development부터 레거시 제품 통합까지 경력을 쌓았다. (harry@tralfamadore.com)

Returning a JDBC result set from an Oracle stored procedure


Returning a JDBC result set from an Oracle stored procedure

Bruce P. Blackshaw

Introduction

You would think that returning a JDBC result set from an Oracle PL/SQL stored procedure would be quite straightforward. Unfortunately, it's not as easy as it sounds. But reading this article should tell you all you need to know. Any contributions or corrections welcome - please email me.

There are three basic steps. First, you have to write the stored procedure - which in Oracle is a bit tricky if you're not familiar with PL/SQL. Testing it using the Oracle command-line tool sqlplus is also quirky. And calling it via JDBC isn't exactly standard either.

Writing the stored procedure

If you are used to Sybase or SQLServer, returning a result set from a stored procedure is easy. Just finish the procedure with a "select x,y,z from my_table", selecting whatever columns you wish to return.

Not so for Oracle. You need to use cursors.

A cursor is a work area for a SQL statement that returns one or more rows. It allows you to fetch rows from the result set one by one. Cursors aren't particularly difficult to use, but to return a result set from a PL/SQL stored procedure, you must use a cursor variable. Cursor variables are basically pointers to cursors, and you use them to pass around references to cursors, such as a parameter to a stored procedure. The PL/SQL type of a cursor variable is REF CURSOR.

To use cursor variables, you must define a REF CURSOR type. This type can be strong or weak. Strong types are tied to a specific set of a table's columns. This means a strong REF CURSOR type can only be used with queries (i.e. cursors) returning those columns. Weak types can refer to any cursor, and so are much more flexible. They do, however, sacrifice type safety.

The easiest way forward is to define a weakly typed REF CURSOR in a PL/SQL package. Packages are used in PL/SQL for partitioning functionality. Below, a weak REF CURSOR type called REF_CURSOR is defined in a PL/SQL package called types.

CREATE OR REPLACE PACKAGE types
AS
    TYPE ref_cursor IS REF CURSOR;
END;

This definition can now be used in all stored procedures to declare a variable of type REF CURSOR.

We can now write a stored procedure that returns a REF CURSOR, that in JDBC we can process as a result set.

Assume we start from a table defined as below.

CREATE TABLE STOCK_PRICES(
    RIC VARCHAR(6) PRIMARY KEY,
    PRICE NUMBER(7,2),
    UPDATED DATE )

Here we have a table of stock prices, with the RIC (Reuters Instrument Code) as the primary key.  We define a PL/SQL function that simply declares a cursor that returns all columns for stocks below a certain price.

CREATE OR REPLACE FUNCTION sp_get_stocks(v_price IN NUMBER)
    RETURN types.ref_cursor
AS
    stock_cursor types.ref_cursor;
BEGIN
    OPEN stock_cursor FOR
        SELECT ric,price,updated FROM stock_prices
        WHERE price < v_price;

    RETURN stock_cursor;
END;

These can all be created via the sqlplus command-line tool. Download the SQL script, and start up sqlplus.

C:\>sqlplus username/password

Once in sqlplus, run the script. If you start up sqlplus in the directory the SQL script is in, you can run it using the @ command:

SQL>@stock_prices

You should get an encouraging list of messages such as "1 row created", "Package created", "Function created". If instead you get error messages such as "insufficient privileges", your user must be given additional database privileges. The predefined Oracle roles CONNECT and RESOURCE should be what you need. Login as the system user and run the below:

SQL>GRANT CONNECT, RESOURCE TO username;

Testing the stored procedure

To test the stored procedure, we can either execute it from within an environment that allows you to execute stored procedures and supply their parameters, such as SQL Navigator or Toad, or we can run it from within sqlplus.

Executing a stored procedure from within sqlplus is straightforward once you know how.

Firstly, start up sqlplus and declare a sqlplus variable of type refcursor. This declares a sqlplus variable of type refcursor (a sqlplus type), called "results":

SQL> var results refcursor

Next, execute the procedure, supplying a number as a parameter, and assigning the result into our variable, "results". Note the unusual syntax.

SQL> exec :results := sp_get_stocks(20.0)

PL/SQL procedure successfully completed.

Finally, use the sqlplus print statement to print out the result set

SQL> print results

RIC PRICE UPDATED
------ --------- ---------
AMZN 15.5 21-OCT-01
SUNW 16.25 21-OCT-01
ORCL 14.5 21-OCT-01

If this works successfully, similar to the above, the stored procedure (well, function) is working correctly.

Calling the stored procedure from Java

There are some Oracle-specific tricks to calling the above stored procedure from Java.

The query string can be in the Oracle format or the standard JDBC callable statement syntax. If you are using the Oracle syntax, the query string is:

begin ? := sp_get_stocks(?); end;

If you are using the JDBC syntax, the query string is:

{ call ? := sp_get_stocks(?) }

In each case the spacing is important - the query will not work otherwise.

Secondly, the out parameter must be registered to be of type OracleTypes.CURSOR.

And finally, use getObject() to retrieve the result set.

The code (without error handling) is illustrated below. A more complete code sample can be downloaded from here.

String query = "begin ? := sp_get_stocks(?); end;";

CallableStatement stmt = conn.prepareCall(query);

// register the type of the out param - an Oracle specific type
stmt.registerOutParameter(1, OracleTypes.CURSOR);

// set the in param
stmt.setFloat(2, price);

// execute and retrieve the result set
stmt.execute();
ResultSet rs = (ResultSet)stmt.getObject(1);

// print the results
while (rs.next()) {
    System.out.println(rs.getString(1) + "\t" +
        rs.getFloat(2) + "\t" +
        rs.getDate(3).toString());
}

Hopefully, this code will be all you need to get started on calling your own Oracle stored procedures via JDBC.

References

  1. Oracle JDBC FAQ
  2. Oracle JDBC How-To Documents

참조 :
http://www.idevelopment.info/data/Programming/java/jdbc/PLSQL_and_JDBC/RefCursorExample.java

DBMS_OUTPUT.PUT_LINE

DBMS_OUTPUT.PUT_LINE allows you to write information to a buffer throughout the execution of a trigger/procedure. That information is available to be read by a trigger/procedure (using GET_LINE(S)), or dumped to SQL*Plus upon completion of execution.

One of the most common misconceptions is that PUT_LINE writes data immediately to SQL*Plus. That is not true. PUT_LINE only puts it in the buffer. You will not see it before the block has executed. I can prove that with this example (note: you must load the user_lock package for this):

scott@Robert> BEGIN
2 DBMS_OUTPUT.PUT_LINE('Going to sleep for 10 seconds...');
3 USER_LOCK.SLEEP(1000);
4 DBMS_OUTPUT.PUT_LINE('Woke up after 10 seconds.');
5 END;
6 /
Going to sleep for 10 seconds...
Woke up after 10 seconds.

You will have seen both messages come out after 10 seconds as opposed to one before and one after.

Despite the fact that it doesn't write messages throughout its progress, PUT_LINE can still make a useful debugging tool. I like the way that the messages can be kept but easily disabled by using DBMS_OUTPUT.DISABLE. Any PUT_LINE messages are silently ignored if you have DISABLEd DBMS_OUTPUT (or failed to ENABLE).

To see the messages, you need to call DBMS_OUTPUT.ENABLE. The only parameter is buffer_size, which, if NULL, will default to 20000. The buffer size can be anywhere from 2000 to 1000000.

scott@Robert> BEGIN
2 DBMS_OUTPUT.DISABLE;
3 DBMS_OUTPUT.PUT_LINE('Disabled');
4 DBMS_OUTPUT.ENABLE;
5 DBMS_OUTPUT.PUT_LINE('Enabled');
6 END;
7 /
Enabled

PL/SQL procedure successfully completed.

Incidentally, SQL*Plus's SET SERVEROUTPUT ON will call DBMS_OUTPUT.ENABLE. You can even use SIZE with that command. SET SERVEROUTPUT also includes formatting options, such as FORMAT WRAPPED, WORD_WRAPPED and TRUNCATE (along with a SET LINESIZE) to get the output the way you want it. [EDIT: Fixed Typo]

There are two common errors related to DBMS_OUTPUT.PUT_LINE. The first one is trying to put more than 255 characters per line.

scott@Robert> DECLARE
2 l_string VARCHAR2(300);
3 BEGIN
4 l_string := '1234567890';
5 l_string := l_string || l_string || l_string || l_string || l_string;
6 l_string := l_string || l_string || l_string || l_string || l_string || l_string;
7 DBMS_OUTPUT.PUT_LINE(l_string);
8 END;
9 /
DECLARE
*
ERROR at line 1:
ORA-20000: ORU-10028: line length overflow, limit of 255 chars per line
ORA-06512: at "SYS.DBMS_OUTPUT", line 35
ORA-06512: at "SYS.DBMS_OUTPUT", line 133
ORA-06512: at line 7

The solution here is to use DBMS_OUTPUT.NEW_LINE to split it up into lines. 255 is a hard limit, if you really want to print a line with more than that, you can write your own package that does the same thing as DBMS_OUTPUT. That is actually a very common thing to do. Tom Kyte's has a handy one in Appendix A of "Expert One-on-One Oracle."

The second common error is overfilling your buffer.

scott@Robert> BEGIN
2 DBMS_OUTPUT.ENABLE(2000);
3 FOR i IN 1..1000 LOOP
4 DBMS_OUTPUT.PUT_LINE('This is line ' || i);
5 END LOOP;
6 END;
7 /
This is line 1

This is line 105
BEGIN
*
ERROR at line 1:
ORA-20000: ORU-10027: buffer overflow, limit of 2000 bytes
ORA-06512: at "SYS.DBMS_OUTPUT", line 35
ORA-06512: at "SYS.DBMS_OUTPUT", line 198
ORA-06512: at "SYS.DBMS_OUTPUT", line 139
ORA-06512: at line 4

The solution here is increase the size of your buffer, using ENABLE. The maximum size is 1000000 and that is a hard limit. Once again, you can write your own package as a workaround.

This example also illustrated that even if you have an exception, the contents of the buffer until that point is still available.

The alternative to writing your own package is to write your messages to a table. Then you can query the table at any time to see your debug messages. DBMS_PIPE is another option to consider.

I will close with two more interesting "gotchas" for DBMS_OUTPUT.PUT_LINE.

scott@Robert> BEGIN
2 DBMS_OUTPUT.PUT_LINE(' What happened to my leading spaces?');
3 END;
4 /
What happened to my leading spaces?


This is an SQL*Plus Gotcha. Just be sure to use FORMAT WRAPPED, like so:

scott@Robert> SET SERVEROUTPUT ON FORMAT WRAPPED
scott@Robert> BEGIN
2 DBMS_OUTPUT.PUT_LINE(' There they are!');
3 END;
4 /
There they are!


Here is the second gotcha.

scott@Robert> DECLARE
2 l_bool BOOLEAN;
3 BEGIN
4 l_bool := TRUE;
5 DBMS_OUTPUT.PUT_LINE(l_bool);
6 END;
7 /
DBMS_OUTPUT.PUT_LINE(l_bool);
*
ERROR at line 5:
ORA-06550: line 5, column 1:
PLS-00306: wrong number or types of arguments in call to 'PUT_LINE'
ORA-06550: line 5, column 1:
PL/SQL: Statement ignored

DBMS_OUTPUT.PUT_LINE is not overloaded for Booleans. The solution is to either to write your own package (as mentioned above), or convert from Boolean type to something else for the PUT_LINE call.

For more information, this package is described in (among other places) Oracle's Supplied PL/SQL Packages Reference Guide, Chapter 43:
http://download-west.oracle.com/docs/cd/B10501_01/appdev.920/a96612.pdf

And here is Dan Morgan's Quick Reference:
http://www.psoug.org/reference/dbms_output.html


===============================

오라클에서 중간에 결과값을 찍어볼 때 DBMS_OUTPUT.PUT_LINE() 구문을 사용한다.

(SQL*Plus에서) 결과가 나오지 않는 경우엔 긴장하지 말고,

SQL> SET SERVEROUTPUT ON

입력 이후 확인해 보도록한다.

--TABLE 만들기
--시퀀스 생성
CREATE SEQUENCE tt1_seq start with 1

/
--테이블 생성
CREATE TABLE tt1
(
 temp_id   NUMBER not null primary key,
 data1   VARCHAR2(50),
 data2   VARCHAR2(50),
 create_time TIMESTAMP
)
/
--트리거 생성
CREATE OR REPLACE TRIGGER tt1_ti
   before insert on tt1
   for each row
   declare
    l_temp_id number;
   begin
    select tt1_seq.nextval
      into l_temp_id
      from dual;
   :new.temp_id := l_temp_id;
   end;
/


-- 프로시저 패키지 생성

-- 프로시저 단독으로 사용가능 하지만 원활한 관리를 위해 패키지구성을 통해 활용한다.
CREATE OR REPLACE PACKAGE DATA_PROCESSES IS
 PROCEDURE insert_tt1(l_vdata1 IN VARCHAR2,
    l_vdata2  IN VARCHAR2);
 PROCEDURE delete_tt1(l_nid  IN NUMBER);
 PROCEDURE update_tt1(l_nid  IN NUMBER, l_vdata1 IN VARCHAR2,  l_vdata2  IN VARCHAR2);
END DATA_PROCESSES;
/
-- 프로시저 바디 생성
CREATE OR REPLACE PACKAGE BODY DATA_PROCESSES AS
    -- 삽입 프로시저 생성
     PROCEDURE insert_tt1(l_vdata1 IN VARCHAR2, l_vdata2  IN VARCHAR2)    
     IS  l_stmt_str VARCHAR2(200);    
     BEGIN
        SAVEPOINT start_transaction;  ---- 세이브 포인트 지정
        l_stmt_str := 'INSERT INTO tt1 (data1,  data2, create_time) ' || 'VALUES(:l_vdata1, :l_vdata2, SYSDATE)';
        EXECUTE IMMEDIATE l_stmt_str   USING l_vdata1, l_vdata2;
    
     EXCEPTION
        WHEN OTHERS THEN
        ROLLBACK TO start_transaction; ---- 애러 발생시 애러구문 출력이후 롤백 시켜준다.
        dbms_output.put_line('An error occurred while creating query:' ||    SQLERRM ||'.  Please try again later.');
     END;
    
    -- 삭제 프로시저 생성
     PROCEDURE delete_tt1(l_nid  IN NUMBER)
     IS  l_stmt_str VARCHAR2(200);
     BEGIN
        SAVEPOINT start_transaction; ---- 세이브 포인트 지정
        l_stmt_str := 'DELETE FROM tt1 WHERE temp_id = :1';
        EXECUTE IMMEDIATE l_stmt_str USING l_nid;
     EXCEPTION
        WHEN OTHERS THEN
        ROLLBACK TO start_transaction; ---- 애러 발생시 애러구문 출력이후 롤백 시켜준다.
        dbms_output.put_line('An error occurred while creating query: '|| SQLERRM ||'.  Please try again later.');
     END;
    
    -- 업데이트 프로시저 생성
    /*
        변수 입력받는것과 USING 구문만 효력을 발생한다. sql문에서는 using문에 입력된 순서대로 변수값을 매칭 시킨다.
        l_stmt_str :=에서 :1 :2 :3 이나 :3 :1 :2나 같은 결과를 초래한다.
    */
    PROCEDURE update_tt1(l_nid  IN NUMBER, l_vdata1 IN VARCHAR2, l_vdata2  IN VARCHAR2)
    IS    l_stmt_str VARCHAR2(200);
    BEGIN
        SAVEPOINT start_transaction;  ---- 세이브 포인트 지정
        l_stmt_str := 'UPDATE tt1 SET data1=:3, data2=:1 WHERE temp_id = :2';
    EXECUTE IMMEDIATE l_stmt_str USING  l_vdata1, l_vdata2, l_nid ;
    
    EXCEPTION
    WHEN OTHERS THEN
    ROLLBACK TO start_transaction; ---- 애러 발생시 애러구문 출력이후 롤백 시켜준다.
        dbms_output.put_line('An error occurred while creating query: '|| SQLERRM || '.  Please try again later.');
    END;
END DATA_PROCESSES;


[TEST]
exec DATA_PROCESSES.insert_tt1('data_clm1','data_clm2');
exec DATA_PROCESSES.insert_tt1('data_clm3','data_clm4');
select * from tt1;
exec DATA_PROCESSES.delete_tt1(5);
select * from tt1;
exec DATA_PROCESSES.update_tt1(4,'data1111','data2222');
select * from tt1;


[추천유틸]
원할한 테스트를 위해서 DB관련 유틸을 사용해야 하는데... 개인적으로는 간단편하게 사용할 수 있는
Benthic Software에서 만든 Golden(디비 컨트롤유틸)과 PLEdit와 (프로시져 생성 전용) 추천한다.
음.. 쉐어웨어 인데.. google에서 검색하면 암흑버전 뭐 손쉽게 얻을 수 있고 -_-;;
무엇보다 토드, 오렌지 ... 과 비교하여 볼때 경량형 프로램인지라 좋은거 같음.


'etc > old' 카테고리의 다른 글

Returning a JDBC result set from an Oracle stored procedure  (0) 2008.05.30
DBMS_OUTPUT.PUT_LINE  (0) 2008.05.30
今月の運勢(うん‐せい)  (0) 2008.05.30
blazeDS 개발자 문서  (0) 2008.05.29
org.apache.catalina.core.AprLifecycleListener  (0) 2008.05.29
=================================================================================
今月の運勢(うん‐せい)
=================================================================================
習慣(しゅうかん)は重要(じゅうよう)な事だと思います。
昨日一日日記を書いていないのに、いざと書けなれば難しいです。
時間にかかわらず運動と同じように每日書くのが重要です。
わたしは何かを考えたときに爪(つめ)とか指(ゆび)を砕(くだ)きます。
先生のよい習慣と惡いのは何ですか。秘密(ひみつ)ですか。ふふふ。
今日は、書店(しょてん)で日本語の勉強のためにTV JAPANを買いました。
(実は日本のドラマに興味を持っていて) その中の12星座(せいざ)占(うらな)いによるば,
(わたしは水瓶(すいびょう)星座です。) 伸び伸び動(う)ごける好調期(こうちょうき)才能(さいのう)
才能(さいのう)は惜(お)しみなく披露(ひろう)を
好きな分野への探求心(たんきゅうしん)が功(こう)を奏(そう)し, ...以下省略(いかしょうりゃく)
決論(けつろん) : 金運(うん)UPグッズ★レンタルビデオ, 開運ナンバ-★1。ハ_ハ。
=================================================================================
知らない 單語
=================================================================================
習慣(しゅうかん) 습관. 풍습.
いざ (부사) 막상
かかわらず 「…に(も)~」의 꼴로 …에 관계없이. …에 불구하고. …인데도.
爪(つめ) 손톱
砕(くだ)く 깨물다
とか [병렬조사] 〈「…~…~」의 꼴로〉 …라든가. …든지. …거니.
占(うらな)い【占い】점. 점을 침. 점쟁이.
星座(せいざ) 성좌. 별자리.
水瓶(すいびょう) 물병
伸び伸び(のびのび) 거침없이 자유롭게 자라는 모양. 구김살없이. 무럭무럭. 쭉쭉.
うご・く【動く】움직이다. 이동하다.
好調(こうちょう) 호조. 순조로움
期(き) 때. 기간.
才能(さいのう) 재능
惜(お)しみ 아낌. 아쉬워함.
披露(ひろう) 피로
功(こう) 공적
奏(そう)する 인상(人相)·수상(手相)·가상(家相) 등을 보아 그 좋고 나쁨, 길흉 등을 판단한다.
省略(しょうりゃく) 생략
金運(きんうん) 돈에 관한 운세
開運(かいうん) 개운. 운이 트임.
=================================================================================
사용자 삽입 이미지


시간되면 봐야지 ㅡ,.ㅡ;;

출처 : Adobe 홈페이지

+ Recent posts